For brides that in search for ways to save some cost for the wedding, but still looking amazingly dash, here is really cute and cool idea we can do - DIY Flower Girl Crown.
For step-by-step, please refer to Wedding Chicks Wedding Blog.
Showing posts with label DIY. Show all posts
Monday, June 16, 2014
Friday, May 17, 2013
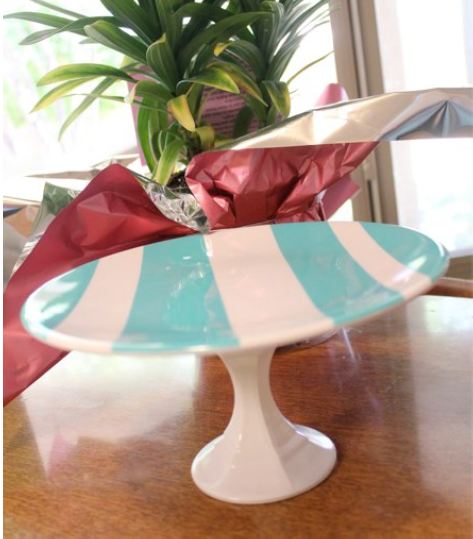
DIY Cake Stand from Blog: Dhiera Nak Kahwin
In Malaysia, we do not have that much options for cake stand
Mostly are plain white on transparent glass based.
To get fancy cake stand could hurt your wallet.
I found this from my blogwalking at brides blog
Love how simple she made this.
Smart and Fast
Bravo!
{ Source : dhiera nak kahwin.blogspot }
Mostly are plain white on transparent glass based.
To get fancy cake stand could hurt your wallet.
I found this from my blogwalking at brides blog
Love how simple she made this.
Smart and Fast
Bravo!
{ Source : dhiera nak kahwin.blogspot }
Labels:
Blog Review,
DIY,
Smartbride
Saturday, May 11, 2013
DIY Garland
If you are looking for simple solution to your simple wall/ room decor,
try this simple steps by Martha Stewart
Tools and Materials
Origami paper
Sunline super natural monofilament (fishusa.com)
Scissors
Needle
Hot-glue gun
Sunline super natural monofilament (fishusa.com)
Scissors
Needle
Hot-glue gun
Origami Garland How-To
- Fold a sheet of origami paper in half on the diagonal. Unfold, then fold again along the other diagonal.
- While the paper is still in this position, fold the two pointed sides in to meet the center crease. It should look like a diamond.
- Unfold so creases are pointing down. Pinch the center angles together to create a four-pointed star.
- Repeat steps 1 to 3 until you have the desired number of origami pieces for a garland. (This will vary depending on how long you want to make it.)
- Thread monofilament onto the needle. Pierce an origami piece through the center with the needle, pulling most of the monofilament through, then secure origami piece in place by putting a dot of hot glue on the monofilament underneath.
- Repeat with all of the origami shapes, spacing them roughly 3 inches apart.
{Source : MartheStewart Wedding Official Website}
Labels:
DIY
Saturday, April 20, 2013
DIY; Tasbih from Blogger
As i was blogwalking,
I saw this pic through her blog; Puteri Gaban
It is a brilliant idea and most importantly also noble.
The best thing is, it can be DIY!
(love the colour combi too miss Puteri Gaban !)
Well done!
Labels:
Blog Review,
DIY,
Gift Favors
Subscribe to:
Posts (Atom)